Getting Started with Digital Works
Dan Stanzione
1. Acquiring Digital Works
Digital Works is available, completely free, from the ECE 201 Homepage:
http://ece.clemson.edu/parl/dstanzi/e201.html
or from the Digital Works homepage:
http://www-scm.tees.ac.uk/users/d.j.barker/digital/digital.htm
Versions are available that run on Windows 3.1, 95, NT, and Linux (If you have a Mac or something else, we can come up with an equivalent program). Digital Works will also be available for student use in the ECE 272 lab on the third floor of Riggs Hall. This lab is usually open during daylight hours (except during sections of L272). To install DW on your home computer, simply run the file you've downloaded and follow the directions, it's a self-extracting archive. Then just click on the icon (3.1) or select from the Start menu (95) to run the program
2. Getting Help
The most important thing to figure out when starting out with new software is how you can find out more about it! In Digital Works, all the documentation exists in the form of online help files. Simply select the ``Help'' pull down menu (the rightmost menu). Click on ``Help Topics'' to pull up the Help window. If you press the ``search'' button in the help window, you can type in any word and find out if if there is help for this subject in the manuals. I find the ``search'' mode much more useful than reading straight through the manuals.
You can find additional help at the Digital Works Home Page (address above). They have a ``problems'' page (not too much here yet), and a ``Parts Centre'' page where you can find a lot of complete circuits and macros for use in Digital Works. Other sources of help would be your TAs, each other, and me.
3. Getting Started
3.1 Adding basic parts
Most of the basic parts you need appear on the toolbar, just below the pull down menus. The symbols on the toolbar are exactly the same as the logic symbols you have in class. For the first couple of labs, locate the symbols for the AND, OR, and NOT gates. You'll learn about all those other gates and symbols soon. There are also a couple of other symbols you will need that don't represent actual gates- The ``+'' represents a power supply (Vcc in your schematic), and the symbol represents ground, both signals you will get off your DigiDesigner box in lab. Another thing your DigiDesigner provides you is LEDs for monitoring the outputs of your circuit. These are also available in the DW toolbar, they are the little circles on the right. Next to the single LED is the seven segment LED (the ``8'' icon), which acts just like the one in your lab kit. If you can't identify one of the symbols, just hold the cursor over it for a second and a tag will pop up telling you what the part is.
To place a part in your circuit, click once on the part you want in the toolbar, then double-click at the point you want the part to be placed. If you want to place multiple copies of the same part, you only need to select it from the toolbar once.
3.2 Moving and deleting parts
To move a part, click on the arrow underneath the tool bar (the one that looks like the cursor,also known as the ``object selector''). Then simply point at the part you wish to move, then press and hold the left button. Drag the part to its new location, then release the mouse button. To delete a part, again choose the object selector, click once with the left button on the part to be deleted (the part should become highlighted) then press the delete key or choose ``delete'' from the ``edit'' menu.
3.3 Wiring parts together
One of the other Icons on the toolbar looks like a pencil. This is your wiring tool (why a pencil, I don't know). To connect components in your circuit together, first click on the wiring tool. Go to the first element you want to connect. When you get to the place your cursor over the connection point on the component, a little tag that says ``wire'' will pop up. Click the left button once to start drawing. Move to the second point you wish to connect (while your drawing the wire, your cursor will turn into a pencil). When the ``wire'' tag pops up again, click once again and your wire will be complete. If you wish to end a wire without connecting to another circuit element, press the right mouse button rather than the left and the circuit will terminate in a small square (indicating an external connection - useful for drawing chip schematics). Wires may start either at connection points on circuit components or at any point along another wire.
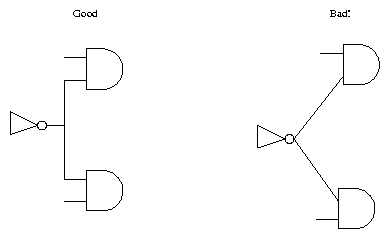
A tip to keep your schematics neat: if you click on the left button while drawing a wire, that point in the
wire gets ``fixed'', and you can continue drawing in a different direction. It generally looks better if all your wires run vertical or horizontal, never at crazy angles (see figure)
Figure 1: Good and bad wiring practices
3.4 Inserting Macros
Occasionally, you may want to insert a part which is not on the toolbar, or represents a collection of parts (such as a model of one of the 7400 series chips you use in lab). This capability is provided in Digital Works in the form of macros. Creating macros will be discussed later. To insert an existing macro in your document, click on the icon that looks like a chip on the toolbar (``embed macro''), then click once at the place in your circuit you want the macro to appear. A file dialog box will pop up asking you to find the macro file. If you check in the ``ics'' directory, you will find macros for most of the chips in your lab kit. Once you have selected the macro file, an outline of it will appear in your schematic. Click once more to make the placement of your macro permanent
3.5 Running your circuit
Once you have your schematic properly drawn in DW, you will want to start your simulation. Sequential simulations will be discussed in section 4. For the first 6 or 7 labs, you will be doing strictly combinational circuits, meaning that for all intents and purposes in the simulator everything happens at once. Simulation in a combinational situation is simply a matter of pressing the ``go'' button. In DW, the ``go'' button is the little arrow that points right ( Þ )under the toolbar (the universal symbol for ``play'' ). Click this button and all the appropriate LEDs should light. Click ``stop'' and then ``play'' again to rerun your simulation.
3.6 Using interactive inputs
One of the great features about DW is the ability to interact with your circuit while the simulation is running, in exactly the same way you can work with your circuits in the lab by throwing switches on the DigiDesigner boxes. DW also has an interactive switch. You can find it on the toolbar, and place it just like any other part. This is a simple open/close switch, so if you want the switch to send a ``1'' when closed, you need to hook one end of the switch to your power supply (``+'' pr ``Vcc'') and the other end to the input of your circuit with the wiring tool. As a test circuit, try connecting 1 switch between Vcc and a single LED. The switch only operates when the circuit is running, so press the play arrow. To actually change the value of the switch, you need to choose the ``object interaction selector'' (the hand) from the toolbar. Then simply click on the switch to toggle it from one position to the other. If you do this while the ``play'' button is pressed, you should actually see the light go on and off.
3.7 Adding Comments to your schematic
Once you have your schematic drawn and simulating correctly, it's helpful to put some comments in the schematic (a title, labels for pin numbers, notes about why you did something, etc.) To add comments, simply click on the ``A'' in the toolbar, click where you want to have your comment, and begin typing.
4. Sequential Circuit Simulation/Timing Diagrams